> For the complete documentation index, see [llms.txt](https://user.netmera.com/netmera-developer-guide/llms.txt). Markdown versions of documentation pages are available by appending `.md` to page URLs; this page is available as [Markdown](https://user.netmera.com/netmera-developer-guide/integrations/via-integration.md).

# VIA Integration

VIA is a communication management system for SMS and email permission management. This page covers VIA setup in Netmera, the available consent flows, the request parameters, and how `referenceId` affects user creation and updates. For more details about VIA, visit the [VIA website](https://via.iletiys.com.tr/).

### Configure VIA in Netmera Panel

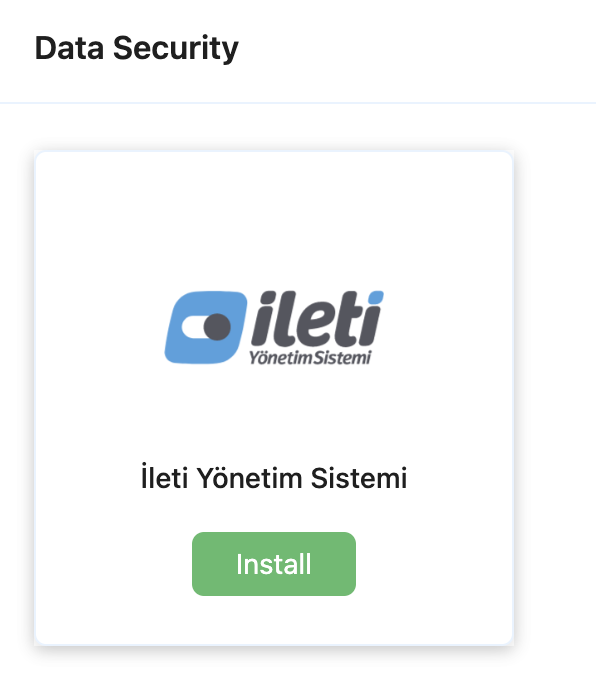
1. Navigate to **Netmera Panel > Connectors > Installed > IYS**.
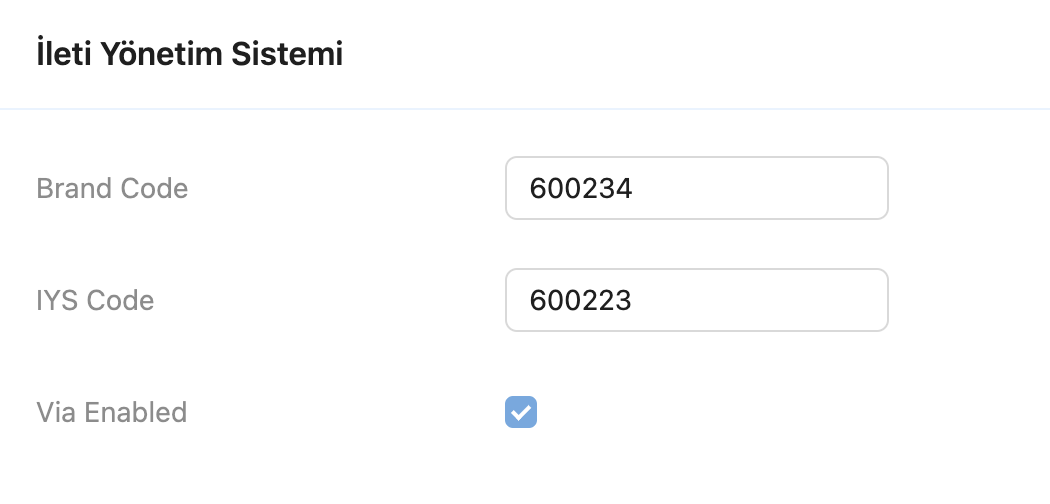
2. Set the correct IYS configuration:
   * Fill in the **Brand** and **IYS Codes** fields with the values obtained from IYS.
3. Enable the VIA feature by selecting the **Via Enabled** checkbox.

<div align="left"><figure><img src="/files/ULoOlMPI4jF3qdu5a49e" alt="" width="298"><figcaption><p>Connectors</p></figcaption></figure> <figure><img src="/files/RQzrndJfQ4fLkKLp38wu" alt="" width="375"><figcaption></figcaption></figure></div>

{% hint style="info" %}
Incorrect configuration

If the configuration is incorrect or the checkbox is not enabled, REST service responses will return with the following errors:

**Error Code: 400 - Bad Request**

```json
validationError: IYS config is invalid for appKey
validationError: Via service is inactive for appKey
```

{% endhint %}

### SMS and email permission management

You can obtain user consent or decline for SMS and email preferences in two ways when using VIA integration:

**1. Consent Management via Short URL**

* Use the form created in the IYS panel to send a short URL to users, allowing them to manage their SMS or email preferences.

**2. Consent Management via One-Time Password (OTP)**

* Use the form created in the IYS panel to send an OTP to users, enabling them to confirm their SMS or email preferences.

{% hint style="danger" %}
**IYS form requirements**

**Create Separate Forms**

While you can obtain SMS and email permissions simultaneously through the same OTP or short URL, forms for **Short URL** and **OTP Consent** must be created independently. A single combined form that includes both Short URL and OTP is **not permitted**.

**Use the IYS Panel for Form Generation**

Forms must be generated directly through the **IYS panel**. Netmera does not support form creation, as this process is exclusively managed by IYS.
{% endhint %}

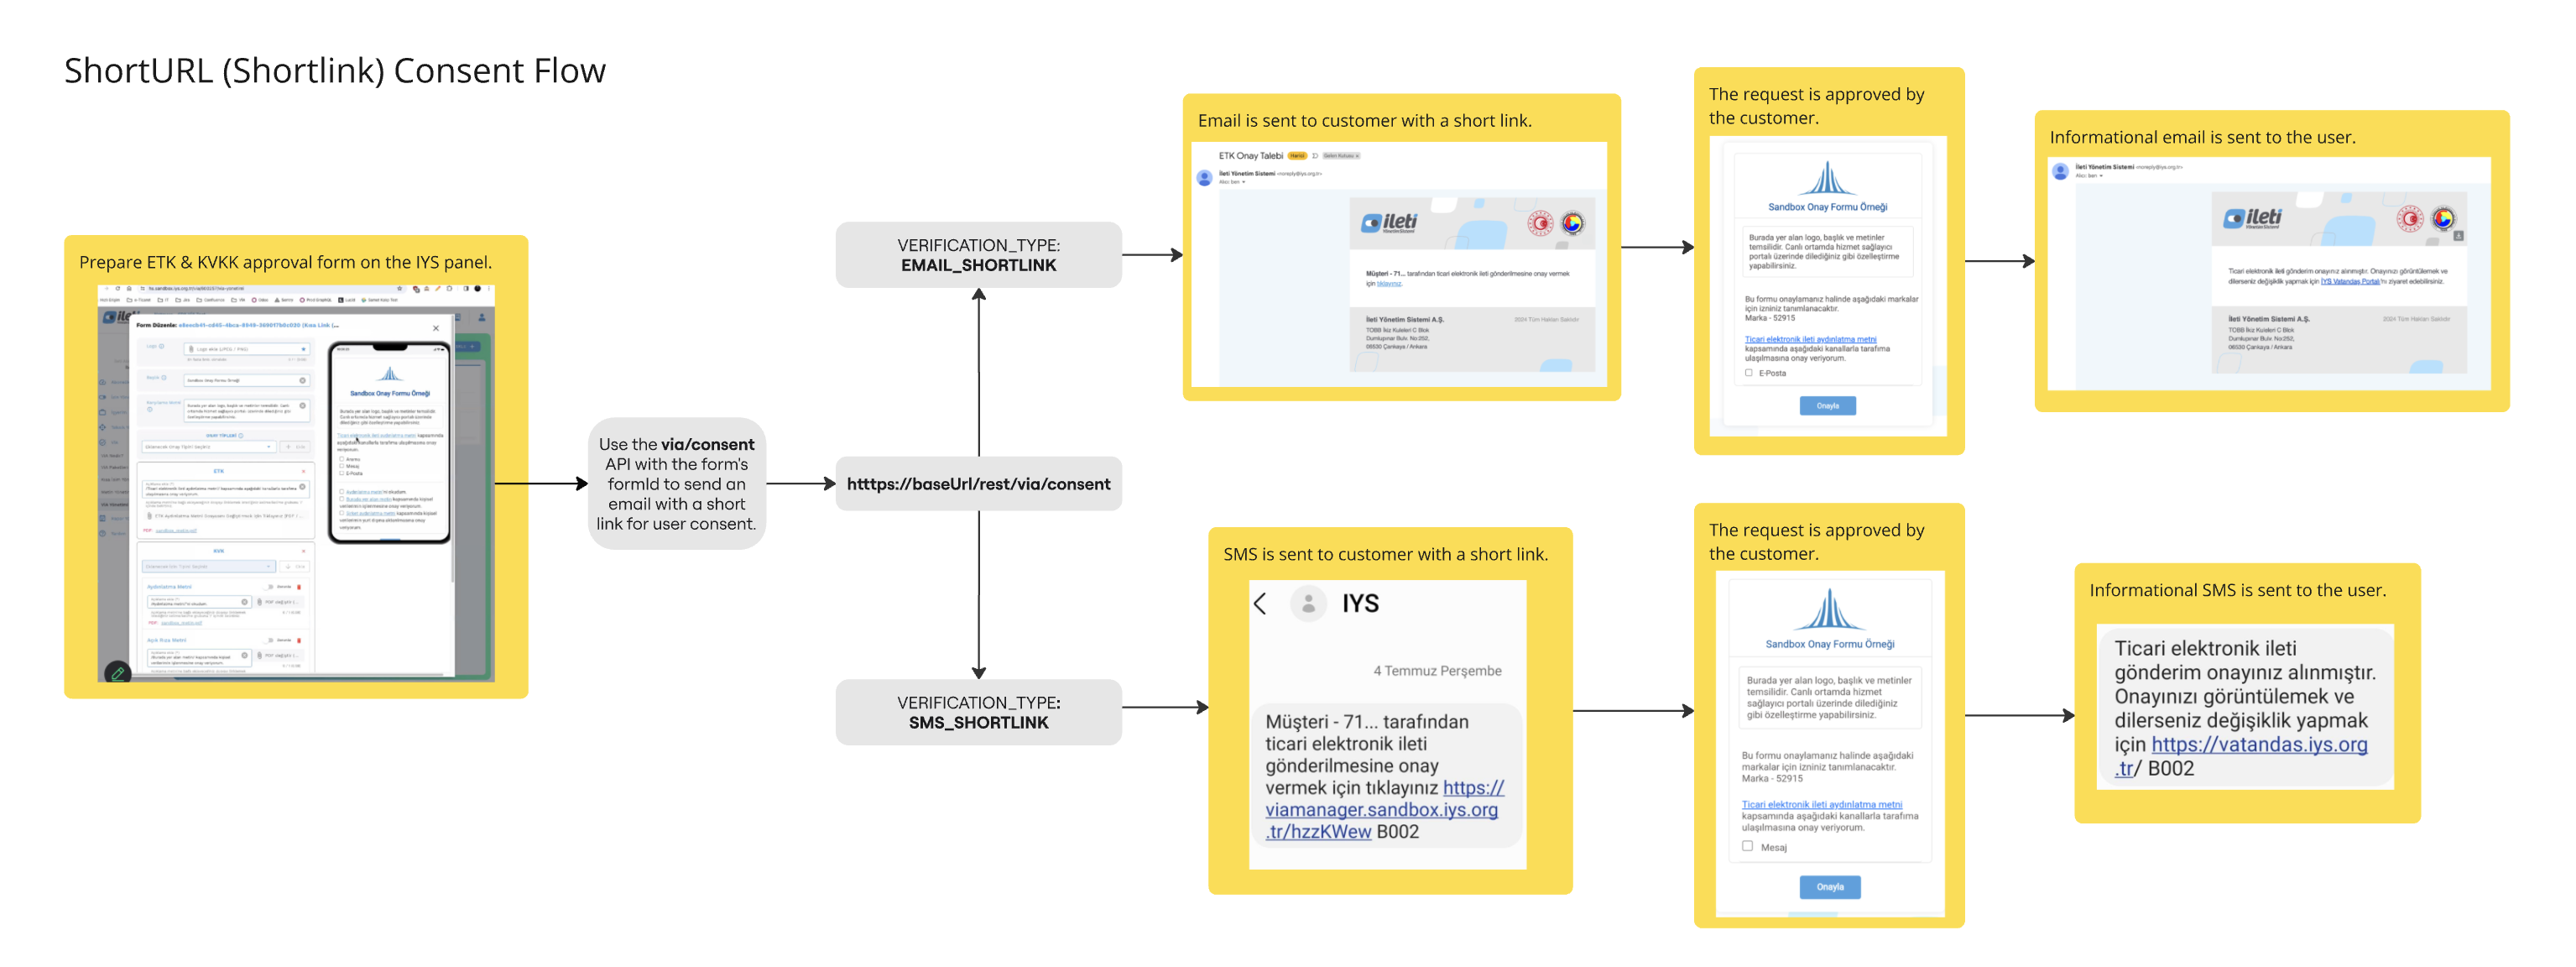
### Short URL consent flow

<figure><img src="/files/M9SNfAOXvijs3EdsEHBP" alt=""><figcaption></figcaption></figure>

For a full version, please see the board [here](https://miro.com/app/board/uXjVLpw19Ro=/?share_link_id=564915471499).

{% stepper %}
{% step %}

#### Prepare the Short URL consent form

Prepare a Short URL consent form using your IYS Panel. Once the form is ready, submit it to IYS for approval.
{% endstep %}

{% step %}

#### Obtain IYS Approval

After IYS approves the form, it will be available for use in API calls. The form ID provided by IYS will serve as the `formId` value in your requests.
{% endstep %}

{% step %}

#### Send the Consent Form to the User

Send the consent form link to your users via email or SMS. Use the API endpoint `https://restapi.netmera.com/via/consent` to share the link with your users.
{% endstep %}

{% step %}

#### User Submits Their Consent

When the user receives the link, they can open the form, select their SMS or email permissions, and submit their approval.
{% endstep %}

{% step %}

#### Confirmation Information Sent to the User

After the user submits their consent, they will receive a confirmation via email or SMS informing them of the permissions they selected and their submission status.
{% endstep %}

{% step %}

#### Consent Data Saved in Netmera

Netmera saves the user permissions in the Netmera Panel. This synchronization occurs every 10 minutes to ensure the latest user preferences are reflected.
{% endstep %}
{% endstepper %}

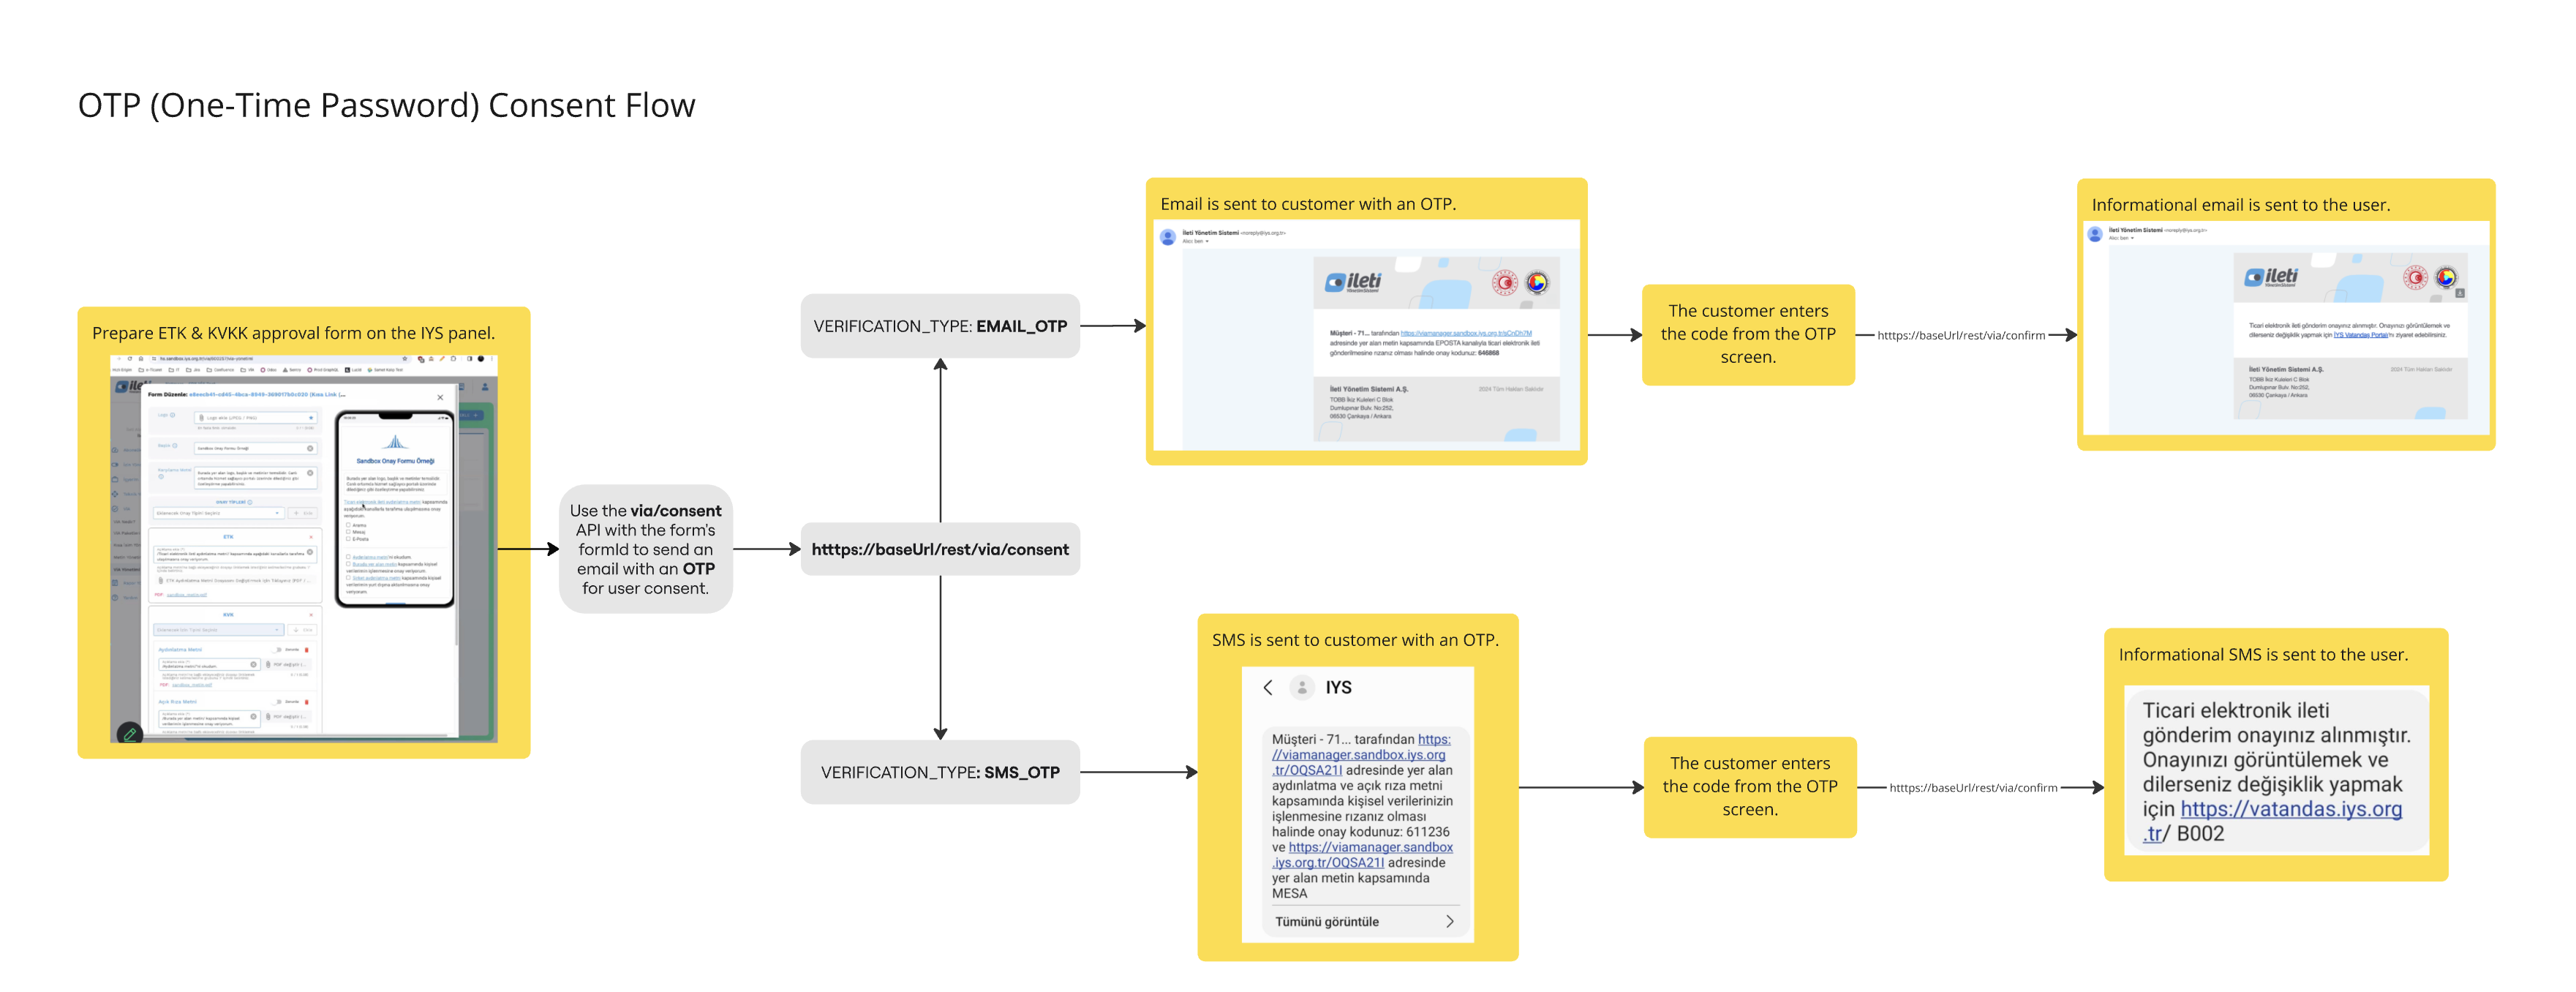
### OTP consent flow

<figure><img src="/files/0kAzOBPW5Nedr4vS0ayy" alt=""><figcaption></figcaption></figure>

For the full version, see the board [here](https://miro.com/app/board/uXjVLp-u5qA=/?share_link_id=530031837291).

{% stepper %}
{% step %}

#### Prepare the OTP consent form

Create an OTP consent form using your IYS Panel. Once the form is ready, submit it to IYS for approval.
{% endstep %}

{% step %}

#### Obtain IYS Approval

After IYS approves the form, it will be ready for use in API calls. The form ID provided by IYS will serve as the `formId` value in your requests.
{% endstep %}

{% step %}

#### Send the Consent Form to the User

Send an email or SMS to the user containing the OTP code. Use the API endpoint `https://restapi.netmera.com/via/consent` to share the code with the user.
{% endstep %}

{% step %}

#### User Submits Their Consent

The user enters the OTP code they received. Use the API endpoint `https://restapi.netmera.com/via/confirm` to submit the OTP.
{% endstep %}

{% step %}

#### Confirmation Information Sent to the User

The user will receive a confirmation via email or SMS, detailing the permissions they selected and the status of their submission.
{% endstep %}

{% step %}

#### Consent Data Saved in Netmera

Netmera automatically saves the user’s permissions in the Netmera Panel. Synchronization occurs every 10 minutes to ensure the latest user preferences are reflected.
{% endstep %}
{% endstepper %}

### VIA consent API parameters

{% hint style="info" %}
Before you start

* `referenceId` is required in every request.
* `formId` must come from the VIA Management interface.
* `recipient` must be an email address or an MSISDN in `+90...` format.
* `name`, `recipientIdNumber`, `address`, and `personData` are required only for KVKK requests.
  {% endhint %}

#### Base request fields

<table><thead><tr><th width="184.18597412109375">Field</th><th>Required</th><th width="389">Description</th></tr></thead><tbody><tr><td><code>title</code></td><td>Yes</td><td>Specifies the consent type to request. Use <code>ETK</code> for ETK consent requests.</td></tr><tr><td><code>types</code></td><td>Yes</td><td>Specifies the channel or consent type to request.</td></tr><tr><td><code>recipientType</code></td><td>Yes</td><td>Specifies the recipient type: <code>BİREYSEL</code> or <code>TACIR</code>.</td></tr><tr><td><code>formId</code></td><td>Yes</td><td>ID of the consent form to send. Get this value from the VIA Management interface.</td></tr><tr><td><code>recipient</code></td><td>Yes</td><td>Recipient phone number in <code>+90...</code> format or recipient email address.</td></tr><tr><td><code>verificationType</code></td><td>Yes</td><td>Specifies the consent method to use for the request.</td></tr><tr><td><code>referenceId</code></td><td>Yes</td><td>Unique identifier used to create or update user records in Netmera.</td></tr></tbody></table>

#### Allowed values

<table><thead><tr><th width="195">Field</th><th width="248">Context</th><th>Description</th></tr></thead><tbody><tr><td><code>types</code></td><td>ETK</td><td><code>"ARAMA"</code>, <code>"MESAJ"</code>, <code>["ARAMA", "MESAJ"]</code>, <code>["MESAJ", "ARAMA"]</code>, <code>"EPOSTA"</code></td></tr><tr><td><code>types</code></td><td>KVKK</td><td><code>"AYDINLATMA_METNI"</code>, <code>"ACIK_RIZA_METNI"</code>, <code>"YURTDISI_AKTARIM"</code></td></tr><tr><td><code>verificationType</code></td><td>Consent request</td><td><code>"SMS_OTP"</code>, <code>"EPOSTA_OTP"</code>, <code>"EPOSTA_SHORTURL"</code>, <code>"SMS_SHORTURL"</code>, <code>"EPOSTA_APPROVALURL"</code></td></tr></tbody></table>

#### KVKK-only fields

<table><thead><tr><th width="184.18597412109375">Field</th><th>Required</th><th width="389">Description</th></tr></thead><tbody><tr><td><code>name</code></td><td>Required for KVKK</td><td>Recipient’s first and last name.</td></tr><tr><td><code>recipientIdNumber</code></td><td>Required for KVKK</td><td>Recipient’s Turkish Identity Number.</td></tr><tr><td><code>address</code></td><td>Required for KVKK</td><td>Recipient address details.</td></tr><tr><td><code>personData</code></td><td>Required for KVKK</td><td>Object that contains <code>name</code> and <code>recipientIdNumber</code>.</td></tr></tbody></table>

#### Response body fields

<table><thead><tr><th width="126.41961669921875">HTTP Code</th><th width="150">Field</th><th>Description</th></tr></thead><tbody><tr><td><strong>200</strong></td><td><code>requestId</code></td><td>Returned when the consent request is created successfully. Use it to check request status or confirm an OTP flow.</td></tr><tr><td><strong>400</strong></td><td><code>message</code></td><td>Returned when the request fails validation.</td></tr><tr><td></td><td><code>code</code></td><td>Returned for IYS-side validation errors.</td></tr><tr><td></td><td><code>value</code></td><td>Returned when the failing input value is available.</td></tr><tr><td><strong>500</strong></td><td><code>message</code></td><td>Returned when the server cannot parse the request data.</td></tr></tbody></table>

### User update or create with `referenceId`

`referenceId` is a required field. It uniquely identifies the user in Netmera and determines whether Netmera updates an existing user or creates a new one.

{% hint style="info" %}
If `referenceId` is not provided

If `referenceId` is missing from the request, the system returns **400 Bad Request** with the message *“ReferenceID is empty”*.

```json
{
  "message": "referenceId is empty",
  "status": 400
}
```

{% endhint %}

#### How Netmera matches a user

{% stepper %}
{% step %}

#### Check email

Netmera first looks up the user by **email address** without using `referenceId`.

If a matching user exists, Netmera updates the user’s **consent status** based on the VIA response. For example, the status can change to “Onay verildi” or “Onay verilmedi”.
{% endstep %}

{% step %}

#### Check MSISDN

If no user is found by email, Netmera looks up the user by **MSISDN**.
{% endstep %}

{% step %}

#### Check `referenceId`

If no user is found by MSISDN, Netmera looks up the user by `referenceId`.

If `referenceId` exists, the user was likely created earlier through the **VIA** channel. Netmera then updates the user’s **MSISDN** and **consent status**.
{% endstep %}

{% step %}

#### Create or update the user

If Netmera still does not find a matching user, it creates a new user with the available identifier values.
{% endstep %}
{% endstepper %}

#### If no user exists for `referenceId`

If Netmera does not find a user for the given `referenceId`, it creates a new user with the available permission identifier.

* If only **email** is provided, Netmera creates a user with email and sets MSISDN to **false**.
* If only **MSISDN** is provided, Netmera creates a user with MSISDN and sets email to **false**.
* If both are provided, Netmera creates one user with **both identifiers**.
* Netmera stores `referenceId` as a **profile attribute**.

For example, if Netmera finds no email match, no MSISDN match, and no `referenceId` match, it creates a new user. If the request includes both email and MSISDN, the new user stores both identifiers.

{% hint style="info" %}
**Why separate users can appear**

Netmera can create separate email and MSISDN users when no shared `referenceId` exists yet. Later requests can merge them when both identifiers can be linked to the same user.
{% endhint %}

#### User creation scenarios

<table><thead><tr><th width="337.92864990234375">Scenario</th><th>Result</th></tr></thead><tbody><tr><td>User does not exist as an email user and grants email permission.</td><td>Netmera creates a new email user.</td></tr><tr><td>User does not exist as an MSISDN user and grants MSISDN permission.</td><td>Netmera creates a new MSISDN user.</td></tr><tr><td>User already exists as an email user and grants only MSISDN permission.</td><td>Netmera creates a new MSISDN user. Since there is no <code>referenceId</code> match yet, Netmera cannot link both identifiers to the same user. If email permission is granted later, the users can merge.</td></tr><tr><td>User already exists as an MSISDN user and grants only email permission.</td><td>Netmera creates a new email user. Since there is no <code>referenceId</code> match yet, Netmera cannot link both identifiers to the same user. If MSISDN permission is granted later, the users can merge.</td></tr><tr><td>User does not already exist as an email or MSISDN user and grants both permissions.</td><td>Netmera creates one user with both identifiers.</td></tr><tr><td>User already exists as an email user but not as an MSISDN user, and both permissions are granted.</td><td>Netmera merges the user into a single record when the MSISDN request arrives first. The existing email user is not duplicated.</td></tr><tr><td>User already exists as an email user and grants only email permission.</td><td>Netmera updates the existing email user instead of creating a new one.</td></tr><tr><td>User already exists as an MSISDN user and grants only MSISDN permission.</td><td>Netmera updates the existing MSISDN user instead of creating a new one.</td></tr></tbody></table>


---

# Agent Instructions
This documentation is published with GitBook. GitBook is the documentation platform designed so that both humans and AI agents can read, navigate, and reason over technical content effectively. Learn more at gitbook.com.

## Querying This Documentation
If you need additional information that is not directly available in this page, you can query the documentation dynamically by asking a question.

Perform an HTTP GET request on the current page URL with the `ask` query parameter, and the optional `goal` query parameter:

```
GET https://user.netmera.com/netmera-developer-guide/integrations/via-integration.md?ask=<question>&goal=<endgoal>
```

`ask` is the immediate question: it should be specific, self-contained, and written in natural language.
`goal` is optional and describes the broader end goal you are ultimately trying to accomplish on behalf of the user. GitBook uses it to tailor the answer towards what is most useful for that goal.

The response will contain a direct answer to the question and relevant excerpts and sources from the documentation.

Use this mechanism when the answer is not explicitly present in the current page, you need clarification or additional context, or you want to retrieve related documentation sections.